Today we’re going to take a look at what can cause the back wheel of your mountain bike to wobble, and how to fix it! Also as a bonus – how to prevent it from happening in the first place!
I’ve been a mountain biker since around 2004, and have definitely been pretty rough on my bikes over the years, so a wobbling back wheel is something I’ve seen on more than a few occasions – and yes, much of that is due to my enthusiasm for riding being greater than my skill with the bike. 😀
So what can cause mountain bike wheels to wobble?
Firstly, we need to understand what out of all the possible reasons is causing our rear wheel wobble on the bike.
- Loose wheel hub
- Bent axle
- Damaged or loose spokes
- Wheel truing issues
- Rim damage
- Tire issues
- Frame or fork alignment
Lets identify the cause of the wheel wobble
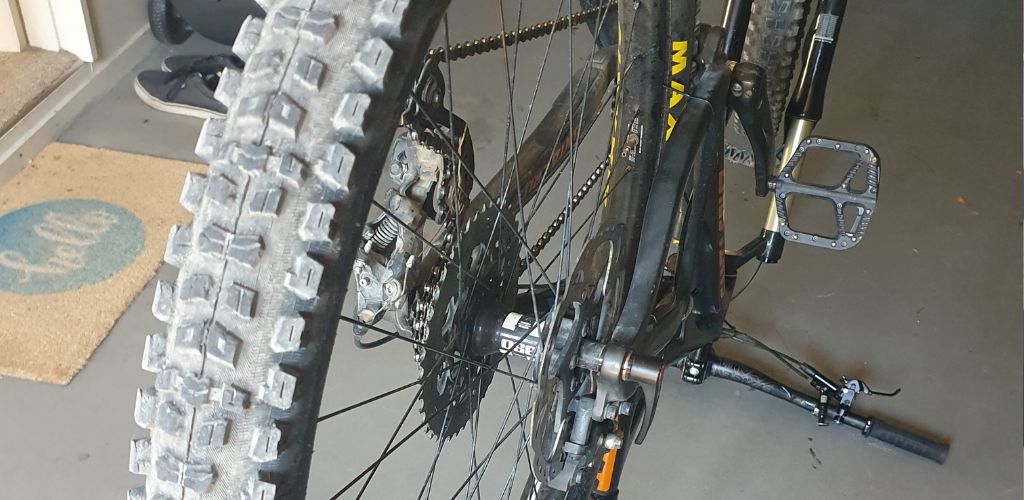
In my experience, most commonly for me it has been that the wheel has taken a battering, from riding through rock gardens, slightly casing jump landings, or any of the other variety of hard hitting abuse that mountain bike wheels take, which can cause dings to the rim, and causes the spoke tension to change around the wheel.
So first things first, we should make sure the wheel is correctly and securely fitted into the dropout of the frame, whether it is using a quick release skewer or through axle.
As most “real” mountain bikes do use solid through axles, this leaves very little to chance – as long as the axle is not bent, is through the frame dropouts at the rear of the bike, and tightened, the wheel is almost sure to be secure in the correct place.
Next we can easily look around both sides of the wheel to make sure the tire is correctly fitted.
It is possible for instance that the tire was not inflated enough to “pop” onto the bead correctly, so might dip down too low into the rim at certain points, which can create a wobble effect on the tire when your mountain bike wheel spins.
If you do spot that, check the tire pressure with your tire pressure gauge (or floor pump that has inbuilt pressure gauge), and give it a bit higher pressure and you should hear the tire pop onto the bead, and then see it all seated evenly when you slowly spin it.
Now we can turn our attention to the rim and spokes. Most mountain bikers like you or I don’t have a wheel truing stand in our garage, so we make do with what we have to hand.
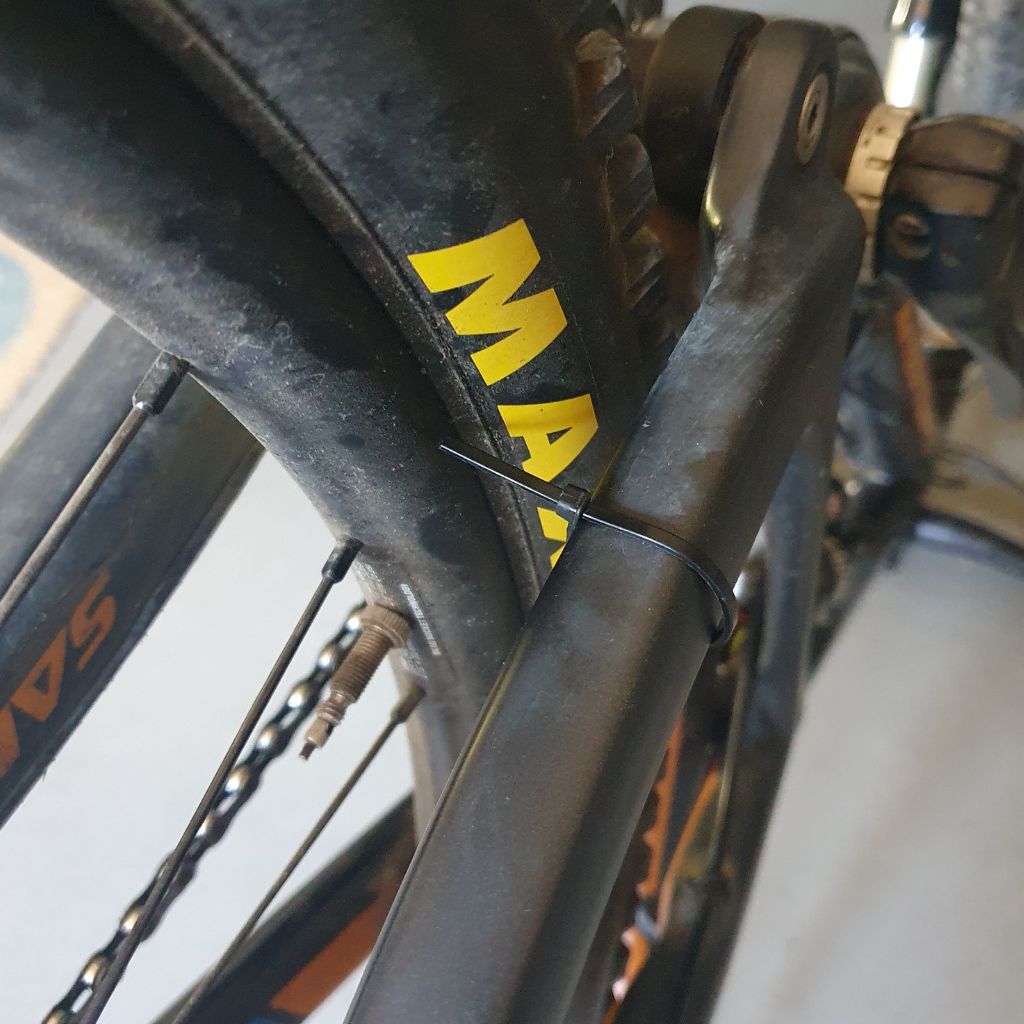
One trick is to either put your mountain bike in your workstand, or even upside down, so you can spin the wheel freely.
Then attach a cable tie to the frame and cut it to length so that the cable tie just brushes the rim of your wheel as it spins.
You’ll very easily then be able to see how much your wheel wobble is being caused by the rim moving side to side.
While we are inspecting the wheel closely like this, we also want to make sure the rim is clean of mud and dirt, so we can spot any damage to the rim or spokes.
It’s during moments like this that in the past I have discovered cracks or nasty dents in a rim – which are obviously not a good thing, and usually mean we need to start thinking about getting a new wheel built up.
The spokes are one of the most likely things to be needing attention to solve the wobbling rear wheel on a mountain bike, so we’re going to look at these closely while we spin the wheel too.
One or more spokes could be broken, or bent – or more likely, could be at a very different tension to the other spokes in the wheel.
Handy hint: If you didn’t already know, as a quick check, you can “pluck” at each spoke almost like plucking at a guitar string, to hear its tone.
When you do this to all the spokes, you’ll be able to hear which ones sound markedly different to the others.
So you might hear one or two next to each other have a really low dull sound compared to all the others that have a high-pitched ding to them. This would usually indicate that you’re needing to tighten up those dull low pitch spokes to match the others.
Remember though – only compare spokes on one side of a rim at a time, the spokes splayed out to the other side of the rim will sound slightly different.
So how do we fix the wobbly wheel?
It all depends on what we have found as the cause of the wobbly wheel on our bike.
If the wheel is securely locked in place into the frame, then we can rule that out.
If the tire is confirmed as correctly seated evenly on the rim, then we should be able to rule that out too.
So that leaves the rim and spokes, which together should be evenly tensioned to create a very strong, straight spinning even wheel.
If we have found any cracks in the rim, we’re going to need to replace that wheel.
To do this, it’s likely if you have a decent mountain bike that you can reuse your existing hub, and tire, and just get a bike shop mechanic to build you a wheel with a new rim and new spokes.
That’s what I did a few years back, after I’d been having a lot of issues at the bike park with my stock wheels getting an absolute battering, and detensioning the spokes, getting rear wheel wobble, and always needing to get my rear wheel re-trued (where the mechanic uses spoke tool to evenly tension all the spokes again, to make the wheel strong and spin true once more).
After a while of this, I decided enough was enough, and ordered up a new stronger wheelset… built with Stans EX3 Flow rims, using stronger spokes, and haven’t had an issue since really.
I asked them to reuse my existing hub, and tire, and obviously I also kept my existing cassette as I wasn’t changing around my drivetrain, to keep costs in check.
If the rim is all good structurally, but you find one or two broken spokes (perhaps broken at the spoke nipple where it joins the rim), then you can likely look to just get those spokes replaced – or if it’s starting to happen regularly, look to get your wheel rebuilt with new fresh (and potentially stronger) spokes.
However one of the most common scenarios is simply that the wheel has taken a few heavy hits, and some of the spokes just need tightening with a spoke tool.
If for instance everything else is looking sound, but when you spin the wheel, the cable tie is brushing just one place on the disc brake side of the wheel, then it is likely that if you pluck the spokes on the other (drivetrain) side of the wheel at that same corresponding place, you’ll hear dull low pitched spokes on that side in that spot.
To fix that, you’ll need a spoke wrench that fits your spokes (I use a handy multi spoke tool that has 4 common spoke sizes).
Then you simply tighten that spoke a little at a time, by turning it counter-clockwise.
Try plucking it again, and you should hear that it now sounds closer in tune to the other spokes around the wheel.
It’s likely that you’ll need to do this for a few spokes in that area of that side of the wheel.
Now when you spin the wheel, it should spin more evenly, and hopefully the cable tie will now be the same distance from the rim the whole rotation of the wheel.
It usually takes a bit of trial and error to get this perfect – but even if it’s not perfect, it’s still very possible to get the wheel running much better than it was when you started! (And as a consequence, it will also be a stronger wheel).
Congratulations, you are now a master wheel builder! Well… not quite, but it’s definitely a great DIY mountain bike mechanic skill to have, which you’ll be able to use on your own bikes, and those of your friends and family, to make a meaningful improvement to how the bike rides.
How to avoid getting a wobbly rear wheel
So it’s all well and good to know how to identify what causes your mountain bike wheel to wobble, and how to fix it – but what about how to avoid it happening in the first place?!
Mountain biking can be very tough on our bikes (and our bodies, but that’s a whole other conversation for another day).
Things which can cause a wheel to start wobbling are usually high impact moments while mountain biking that place a lot of stress on the rim and spokes – and really the whole wheel structure.
- Riding over rough terrain – especially large rocks. Can bend rims, loosen spokes etc.
- Landing incorrectly – either jumps or drops, can put significant force on the wheels. Try to use the downslope/transition on a jump or drop, rather than landing to flat, or casing the top of the landing.
- High speed downhilling on gnarly tracks is always going to put a lot of stress on wheels.
- Hitting obstacles (rather than bunny hopping over them or avoiding). Just riding directly into large rocks, roots, logs, potholes etc can cause immediate damage to the wheel. This could be stressing the rim, loosening spokes – or if tire pressures are lower, crunching right through the tire and deforming the rim where it meets the tire etc.
- Poor technique riding technical trails – we’ve already mentioned some of this, but it’s just a fact that bears repeating. Mountain biking can already be very tough on our bikes and components, but just smashing our bikes into every obstacle, casing landings, crunching into the biggest rocks in a rock garden, never bunny hopping over tree branches on the trail and just letting our wheels take the full brunt of every possible impact on the trail we’re riding is always going to bring about wobbly wheels and more time at the bike mechanic than otherwise. 🙂
As always, I hope this helped, and all the best shredding those trails out there, hopefully with less wobbly wheels than before!